Real Device Configuration
In order to communicate with the device under test, the XCUITest driver automatically installs the
WebDriverAgentRunner-Runner (WDA) application on it, using Xcode's command-line utility xcodebuild.
Unlike simulators, real devices have several security restrictions that need to be manually
configured, before this can work:
- Devices need to be trusted. This can be done by opening Xcode and afterwards physically connecting the device under test to the computer. The device should have a popup asking to trust the computer, which you should accept.
- Devices using iOS/iPadOS 16 or above require enabling Developer Mode. Please read
Apple's documentation on Developer Mode
for more details.
devmodectl streamingCLI on macOS 13+ and installing development signed apps also help enabling the mode. - After enabling Developer Mode (if applicable), please turn on Settings -> Developer -> Enable UI Automation
- Webviews will not be testable unless the Safari Inspector is enabled. Please turn it on in Settings -> Safari -> Advanced -> Web Inspector. Similarly, you may want to turn on the adjacent option Settings -> Safari -> Advanced -> Remote Automation.
Finally, the WDA application must have a valid provisioning profile, which includes signing the app and linking it to a development team.
Provisioning Profile Setup
Generally, unless your device under test already has WDA installed, or you already have a prebuilt WDA on your local system, you will need an Apple ID to be able to sign the app.
Once you have an Apple ID, there are several approaches you can take.
- Basic Automatic Configuration: the easiest approach, but requires you to have a paid Apple Developer account
If the automatic configuration did not work or does not apply to you, you will need to follow one of
the manual configuration approaches. All of these involve the WDA Xcode project, so at the very
least, you must know the local path to the project file - WebDriverAgent.xcodeproj:
- The WDA project is included in
appium-webdriveragent, which is installed as a dependency of the XCUITest driver. You can therefore find the project file in/path/to/xcuitest/driver/node_modules/appium-webdriveragent/WebDriverAgent.xcodeproj. By default, drivers are installed in~/.appium, so the project would be located at~/.appium/node_modules/appium-xcuitest-driver/node_modules/appium-webdriveragent/WebDriverAgent.xcodeproj. - If using XCUITest driver v4.13.0 or newer, you can run the
appium driver run xcuitest open-wdadriver script to directly openWebDriverAgent.xcodeprojin Xcode.
The WDA project file can now be used in the manual configuration approaches:
- Basic Manual Configuration: create a new project, then use its provisioning profile and bundle ID
- Full Manual Configuration: associate the provisioning profile directly with the WDA project
- Manual Configuration for a Generic Device: manually run
xcodebuildto build WDA, then manually install it
Validating the WDA Install
Once you have configured the WDA project or have the app ready, you can try installing it. It is possible that you may encounter some errors:
-
xcodebuild exited with code '65' and signal 'null'This usually happens when attempting the automatic configuration, and it means that the necessary code signing is not set up correctly. Follow the steps in any of the manual configuration approaches to fix this.
-
Unable to launch <your-bundle-id>.WebDriverAgentRunner-Runner because it has an invalid code
  signature, inadequate entitlements or its profile has not been explicitly trusted by the user.
This means that the developer is not trusted on the device. If you manually try to open the WDA app on the device, you will see a popup message:
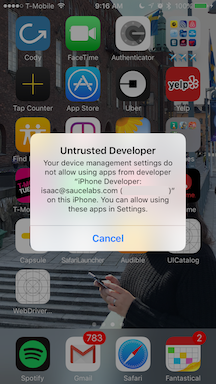
To fix this, you need to open Settings -> General -> VPN & Device Management on the device, then select your development team and trust it. Afterwards you should be able to open/launch the app. See Apple documentation for more information.
-
For other issues, please refer to the Troubleshooting page
Create an Offline Provisioning Profile
Since iOS 16, Apple requires a device to have a live internet connection for validating the code signing. It is possible to set up an offline enabled provisiong profile, which allows you to avoid the limitation. Please read this issue regarding detailed configuration steps.